Disclaimer: By reading this blog, you may be subjected my ideas of what is "cool", stupid things that I want, obnoxious comments I may make about any given number of things, or deranged thoughts that creep out of my awkward brain. Just letting you know ahead of time.

Sunday, December 26, 2010

Tasting the Vodka Rainbow

Christmas was very homemade this year. I found a tutorial online on infusing vodka with Skittles.

You will need:

-A huge bag of Skittles
-Five separate bottles
-A large bottle of quality vodka

I deposited 80 Skittles of each flavor in each bottle. I used 8 oz of vodka in each 10 oz bottles. Seal it up tight and shake, shake, shake!

I let my bottles sit around for a few days, but you can do the next step as soon as the Skittles are completely dissolved. There will be a white funk floating in the top of each bottle. I think this is the xanthum gum.

The funky white shit must be strained out or otherwise removed. I put a wire sieve over a 4 cup measuring cup (with a convenient pour spout) and placed a coffee filter in it. Pour the contents of the bottle slowly out through the filter and sieve. (You may need to change the coffee filter out due to cloggage.)

Rinse out bottle and pour vodka back into bottle. Seal tightly.

Repeat this with each bottle. You can even filter the vodka through a water filter before or after Skittling.

I gifted mine with a tag on each one with a different recommendation on how to enjoy them. Sprite, club soda, tonic water...On the rocks, in a cocktail, or shots!

Enjoy!
Published with Blogger-droid v1.6.5

Tuesday, December 7, 2010

The Rebirth of Saturday

I was recently awarded Saturdays off....this past weekend was my first week of having Friday and Saturday off work. I documented a bit of our day with photos....My boyfriend and I love going to garage sales...and we saw some pretty interesting things!


All these unique items were spotted at a garage sale on Mandeville Street. It was at an old firehouse that was originally a horse-drawn carriage fire house! How neat is that?! I have to wonder about the doll babies eyes, though....that must've been one angry child...


This photo was snapped at Inferno Art Gallery at 3000 Royal Street.


We stopped over at K-Doe's Mother-in-Laws Lounge because they are closing for good. So sad to see them go...but we got some good deals over there! Check out the EXTREMELY creepy wax version of K-Doe....talk about weird. And that little red cart now resides in my house, after a bit of cleaning up...It's just to die for! 


Our night ended with bicycle ride across the river, via the Algiers Ferry, to see the first Christmas Bonfire since Hurricane Katrina. It was my first Christmas bonfire, too. It was so much fun. I couldn't help but laugh as I said, "Santa's burning up in the fire!!" while little children passed by. I heard them painfully say, "Saaannnttaaa?" BAHAHAHAHA


Thursday, December 2, 2010

Homemade Laundry Detergent

It's so easy and affordable to make your own laundry detergent at home. It consists of 3 ingredients which are, for the most part, easy to find! You'll need Borax, washing soda, and a bar of any kind of soap. You'll also need something to keep your homemade detergent in (hence the coffee tin!), and a grater to grate your bar of soap.
I found the Borax at my local supermarket, Rouse's, in the laundry aisle. The 55oz box cost me about $3.75. The Arm and Hammer Washing Soda was a little more difficult for me to find, and I actually looked for both of these ingredients all over town, but I could only find the Borax locally. The washing soda was $2 from www.alice.com, which is a pretty neat website despite the fact that you must by at least 5 items in order for them to ship your order. But I can assure you, if you order from the site, you can find 5 things to buy. They also do not charge for shipping! You can use scented or unscented soap, and if you feel really adventurous, you can scent your finished laundry detergent with essential oils.  

-Grate the bar of soap over a bowl
-Add 1 cup Borax
-Add 1 cup Washing Soda
-Mix together and store in an air tight container!

Use 1 scoop per load of laundry. For heavily soiled clothes, use two scoops, or add another cleaning agent like OxyClean.

I've been using this method for at least 6 months now, and I'm still on my first boxes of washing soda and Borax! I don't think I've spent more than $10 total!

Tuesday, November 30, 2010

Chewy Gingerbread Cookies


  • For a delicious holiday treat, try baking these amazing molasses cookies. They come out soft and chewy. (Unless you over bake them, of course, and then you can call them ginger snaps!) They have become a holiday favorite! For an extra hint of Christmas cheer, try rolling the cookies in red or green (or both) sugar. Yummmmm!!

  • 1 1/2 cups shortening, melted and cooled
  • 2 cups white sugar
  • 1/2 cup molasses
  • 2 eggs
  • 4 cups all-purpose flour
  • 4 teaspoons baking soda
  • 2 teaspoons ground cinnamon
  • 1 teaspoon ground cloves
  • 1 teaspoon ground ginger
  • 1 teaspoon salt

Direction

-Melt the shortening in a large pan on the stove, and cool.

-Add sugar, eggs, and molasses, beat well.

-In a separate bowl, sift dry ingredients together and add to the pan. Mix well and chill 3 hours or overnight.

-Form into walnut-size balls. Roll in granulated sugar. Place on greased cookie sheet about 2 inches apart

-Bake at 375 degrees F for 8-10 minutes. 

-Store in an airtight container to keep from getting overly crisp. If they do lose their softness, an easy way to restore it is to place one slice of fresh bread in the container with the cookies for a couple of hours or overnight and they will be soft again! (Say what!? Great trick to know!)


Friday, November 19, 2010

Nashville Musician Shingles Roof With Records!

Nashville Musician Shingles Roof With Records


glassmeyer porch vinyl records photo bottom

This is so awesome. I hope I remember it forever, so that when I own my own place, I can make this bad ass patio. Seriously; who doesn't dig this!?

Thursday, November 18, 2010

My Christmas Wish List

Let's see....I'd like:


  • World Peace
  • Population control
  • Eco-friendly everything
  • Every vinyl album ever released by Lee Dorsey
Okay. Enough of the pipe dream wishes. Here's what I'm REALLY hoping to get:

  • Old, working type writer! (I'm thinking, Freecycle.org!)
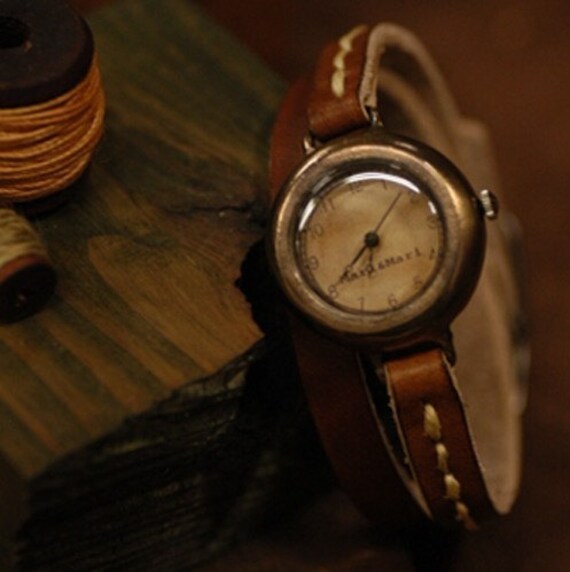
    • A Marrianne-Made watch. God these are amazing. When I dropped my HTC Hero in the toilet last week, I finally realized, "Yes, I really do need a wristwatch." (Check them out on Etsy.com; seller revolt70)
    pretty little watches- DIVA LEATHER - steampunk handmade watches

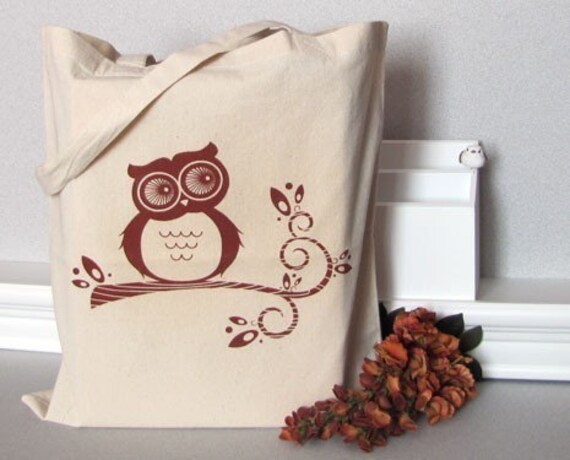
    • This adorable owl tote bag, even though I do not need any more tote bags....(Also from Etsy...seller Sweetharvey)
    TOTE BAG - Screenprinted Owl (TB01)

    • I really love these sweet ass lamps. The coolest shit ever. I found these awesome lamps on anthologymag.com....They have the most captivating style there. If I had a home of my own (sniffle) I would absolutely decorate along these lines. (Check out the work of JamesPlumb.... I love those who re-purpose! www.jamesplumb.co/uk


    • A papasan chair! I had one when I was growing up and need desperately to fill the hole in my life that was created the day we got rid of it.
    Item image

    • This adorable "envelope template"! How cute and creative is this! It's perfect, because I love making envelopes for cards from sheet music..This is just too cute! :)

    Kawaii antique style

    • I fell in love with this coat while attempting to holiday shop for my friends and family. It is absolutely gorgeous..I wonder if it's warm? (Found at www.fredflare.com)

    • Pioneer Postbound Scrap Book....I filled mine all up, and this one is just so awesome. (Even available from WalMart.com!)
    Pioneer Photo Albums 12x12 Fashion Printed Postbound Album: Map


    I guess this is all for now....I'm sure there are plenty more things I would like to have, of course. :)


    Thursday, November 11, 2010

    Another Reason to Love The Arm & Hammer

    If you are one of the unfortunate souls, like me, who suffers from at least one urinary tract infection (UTI) a year, this is some very interesting, valuable information! I am not one to run to the doctor for ANYTHING if I don't absolutely, positively have to, so this just happened to be a fantastic solution to my ridiculous uncomfortable problem.


    We all know how awesome baking soda is. It's great for whitening teeth, cleaning, baking, and now....treating a UTI!

    I started feeling symptoms of a UTI a couple of days ago. I jumped online, looked up natural cures for a UTI and of course found all kinds of things. Everyone knows about cranberry juice helping a UTI, but I saw a mention of Echinacea, too. I had both cranberry pills and Echinacea at home, so I began taking 3 Echinacea and 6 cranberry pills each day. Sadly they seemed not to help. I also read something about drinking a 1/2 tsp of baking soda in a glass of water, and that it should help return your acidic urine to a reasonable pH for your body. I drank a glass yesterday...and well...no more screeching in pain when I pee! How amazing is that!?


    (Update) After a more persistent UTI, I had been trying the baking soda trick every other day or so. I find that it is NOT a cure for a UTI, but does absolutely reduce the pain and discomfort associated with a typical UTI. If taken religiously during a UTI it may actually cure it, but I have yet to find that this is certain.


    Friday, November 5, 2010

    The Cocoa Chewie: Delicious & Gluten Free!

    This just happens to be our new favorite cookie. It is a knock off of a cookie I love to get from Whole Foods. They are so undeniably delicious. I'd never have tried them if it wasn't for those free samples Whole Foods is always giving out...but, my, they are absolutely fantastic. I had absolutely no idea that they were gluten free (no flour used!) and low fat (no butter, either!) and they still come out ridiculously amazing! Only trouble I had was getting them off the foil. The recipe called for parchment, I used my last sheet, and still had trouble getting it off the parchment. The greased foil, on the other hand, well, that was a totally different story. They wouldn't even BUDGE! Ugh. (Not to mention I obviously did not space that batch sufficiently!)

    (Okay, so that batch was a disaster....but it still tasted great!)
    3 cups walnut halves, toasted & cooled
    4 cups/(1 lb) powdered sugar 
             1/2 cup + 3 tbsp unsweetened cocoa powder
              scant 1/2 teaspoon fine grain sea salt
    4 large egg whites, room temperature
    1 tbsp vanilla extract 
    Preheat the oven to 320F. Position the racks in the top and bottom third. Line your cookie sheet with parchment paper. You're going to want to use a large cookie sheet as these cookies spread out quite a bit. You can toast the walnuts in the oven while you're preparing the cookie dough. When you begin to smell the walnuts, it's time to pull them out of the oven! Let them cool and then coarsely chop them.  

    Sift together the powdered sugar, cocoa powder, and salt. Stir in the chopped walnuts, then add the egg whites and vanilla. Stir until well combined. Remember that these cookies contain no flour and the batter will not turn out to be a typical cookie dough. It is very loose and runny, but bakes into the most delicious cookies ever!

    Spoon the batter onto prepared cookie sheets, using about two tablespoons for each cookie. Do not attempt to put more than 6 cookies per sheet, or you'll be sorry! Bake until they puff up, get shiny on the top, and then crack. This should take about 15-18  minutes. I had trouble baking these bad  boys all the way through (and knowning when enough baking was enough), so don't be surprised it if takes 20 minutes or more to bake a batch. You don't want them to be gooey inside, but you certainly don't want them to come out of the oven hard, either. These are CHEWY cookies, not crunchy! They will keep in an airtight container for about three days. (Bet you can't make them last that long!) Enjoy!!

    Makes about 18 large cookies.


    Thursday, November 4, 2010

    Easy Cider Beer


    Here at our house, in the Big Easy, we like to doing things for ourselves, if we can. My boyfriend just loves home brewing craft beers. I'd like to think that I help a little in his endeavors. (though he would probably tell you otherwise!!) 

    This is a very easy way to home brew cider beer. Pictured is a small one gallon glass jug. You will need a rubber stopper, a plastic airlock, priming sugar, a gallon of apple cider, and wine or champagne yeast. We purchase all our brewing supplies locally at Brewstock, however there are many online brewing supply stores to choose from. The yeast packet will specify how much yeast to use per gallon, and just pitch the yeast accordingly! Be sure to sanitize all your brewing supplies before using them, as fermented beverages can become contaminated easily. A brewing supply store will also sell a one-step sanitizer that does not require rinsing.

    A day or so after you pitch your yeast, you will notice that the yeast is kicking ass inside of that glass jug, bubbling things up like crazy! The reason you need an air lock is to allow the oxygen to escape the bottle. If you chose to brew without an airlock, your carboy would likely explode due to all the pressure. The bubbling is caused by the yeast feeding on all the sugars in the cider.

    After a week of fermentation, you can bottle your hard cider. If you already have brewing supplies, you can bottle your cider in glass bottles after adding your priming sugar. You can also use old wine bottles, or even liquor bottles, if you're one of those people who loves to keep all their Jack Daniel's bottles. ;) Let your bottled cider age for another couple of weeks, and voila! You have made your very own hard cider!

    Friday, October 29, 2010

    DIY: Faux Gauges

    I love the look of the spiral jewelry that people wear in their gaged ears, however, I am absolutely NOT interested in gauging my ears in any way. Some time ago I stumbled upon fake gauge earrings on www.etsy.com, and I thought, hell, I could make those!! So, here is my first attempt. My opinion on these particular earrings is that I made them a bit too long, so I will try again sometime and keep the size in mind. I used an old pair of earrings that I didn't think I would ever wear to create these. If you feel so inclined, you can go to a craft store and pick up earring posts and backs, but if you don't need 50 sets, then scrounge up an old pair, like I did.

    You will need:

    (2)  Earring posts with backs
    Polymer Clay, your choice of color
    An oven
    A tooth pick or other small pointed item

    Step One: Read the directions on your polymer clay. I purchased Sculpey, which must be baked at 275F, for 15 minutes per 1/4" thickness.  Preheat your oven.

    Step Two: Roll out the design you prefer your earrings to be in. If you are feeling really adventurous, you can embellish the clay with other colors, rhinestones, glitter, etc. You can make what crafsters call "canes" by rolling or piecing different colors of clay together. Here is a link on how to make canes. I prefer things simple, so I chose not to do anything outrage0us.

    Step Three: After getting both of your earrings as similar in size and shape as possible, decide where you would like the front and back pieces of your earrings to separate. I just simply cut them with a household kitchen knife (a very expensive one at that! Shhh! Don't tell my boyfriend!)

    Step Four: Trim the embellishments off your earrings, if you are using posts and backs from an old pair. I used these cherries that my mom gave me. (Sorry, Ma!! Way to repurpose, right?!) I just snipped off the embellishments with wire cutters.

    Step Five: Place the posts into the cut end of the clay that will be the front part of your earrings. Be sure not to place them too far into the clay, or you will not be able to get them through your ear and into the back of the earring properly. Take your tooth pick and make a small hole in the back part of the earring, large enough to put in the earring back. I used a tooth pick, because just shoving the earring back into the clay will morph the clay and take it out of that lovely shape you just rolled it into.

    Step Six: Smooth out all your finger prints and carefully place the clay earrings onto an oven-safe surface. Bake at 275F (or whatever temperature your specific clay calls for). I baked my earrings for 20 minutes since they were a wee bit thicker than 1/4". Be careful when pulling them out of the oven and off of the cookie sheet (or whatever you used) as they are still hot! You may notice that directly after coming out of the oven, the earrings may still seem a little bit soft. Do not worry, because as the earrings cool they will harden more. After a few minutes of cooling, you are finished!


    Here is my finished product! You can do these in any design you prefer, in any color, and any size! I would like to make some more in different colors and shapes! If you're feeling really ambitious, you can even get out an Exacto knife and carve into your earrings. Now that would be cool.